

We all need a strategy, don’t we?
Disclaimer: I am not a professional trained doctor or therapist, all honest opinions are mine from my past 5 years experience. This post does not contain any affiliation link. Please consult your doctor first when you notice you have discomfort in any area.
Let’s get straight up to the point, if you have read my five years of experience in my last three posts, congratulations! I am glad you are here! 🙂
You may be one of the people who try and think about how to improve your body health, or maybe one of your close friends or family has been suffering from the same pain as I did.
Please give it a try or forward the posts to them! Let’s do it together! Our bodies will listen and will be improved in no time!
So if you remember I mentioned in my previous post about Anterior (forward) pelvic tilt. We have to solve this problem first.
A simple way to test if you have Anterior (forward) pelvic tilt, is by leaning against a wall, keeping your head and feet against the wall tight, then putting your one hand on your lower back, if the gap between your back and wall can fit in your fist, it means you have Anterior (forward) pelvic tilt. If the gap only can fit three fingers’ length, then you have a healthy pelvic alignment, If you don’t have any space in between the wall, you have a Posterior (Backward) pelvic tilt, which I would not discuss in my post here.


Be patient and take it slow but be consistent!
First of all, I would like to emphasize, I did 3 steps in three days (yes, take your weekend to do this, it’s fun!), the reason is I believe our body would take time to warm up and relax.
When in the past I only did one massage or chiropractic therapy once a week, which to many of us, we may feel: Okay, that’s good enough, one thing a day is good, and going by weekly is just doable to your schedule since we are all so busy. But to my five years’ experience, this is not enough at all.
Think about it, you may need to take 20 mins to drive to your chiropractic clinic, the therapist adjusts your body and posture for 15 mins, then you are on the way home or maybe take a break to buy some groceries or hang out with friends for dinner after. After another 30 mins drive home, your body might already forget how it was adjusted when you come home late at night. Posture is something you have to train yourself to have awareness of. So does our body’s muscle memory work this way. In order to get the best result, we need more work consistently than just one thing a week.

Key: Please do not force anything if you have severe pain in your early acute stages, these three steps are only for late-stage when you don’t feel that much pain but are able to decompress your spine.
Three steps are as follows:
- Relax with a heating pad and massage
- Warm-up with yoga stretch pose and pelvic stretch pose
- Yoga stretch poses then training your core with pilates – ending with Ardha Mastsyendrasana (Spine twisting pose)
How I did it:
Step 1. Relax with a heating pad and massage-
Waking up in the morning, put a heating pad underneath your neck and back. Give it 10 mins to relax your muscles.
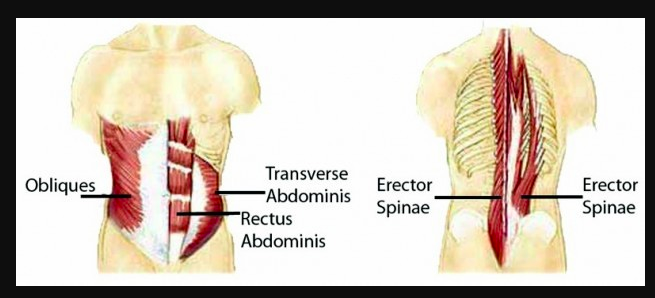
Then Turn to one side, if you have lower left back pain, turn to the right side first, use your big thumb or massage tool give your Erector spinae muscle group (muscle right next to your spine) at the lower back a deep massage for 5 mins, and vice versa to the other side of your lower back.
Step 2. Warm-up with some yoga stretch poses and pelvic stretch pose-
After you have done the relaxing and warming up by the heating pad, now it’s time for muscle groups warm-up. Start with child pose (balasana) first, just rest on your belly nice and calm for one min.

Then stretch your legs, lie on your belly, put a thick cloth or towel or yoga brick underneath your pelvic for a few mins. Just relax and keep it slow. As long as you are comfortable and feeling great with these poses, I highly suggest you do it repeatedly a few times in a day.

Please repeat Step 1 and 2 consistently for three days, and test your pelvic if it is in the right position as the previous testing tip. you must have to put your pelvic back to the normal position first. On the third day, we will do step 3 for decompressing the spine.
Step 3. Yoga stretch poses then Training your core by pilates, ending with Ardha Mastsyendrasana (Spine twisting pose)-
In this step, we are going to combine yoga and pilates, mostly we are focused on warming up and stretching the muscle by yoga first, then following with pilates.
Yoga poses recommended in this step:
Child pose/ baby pose
Side lunge/ Low lunge
Downward-facing dog/ upward-facing dog
cobra pose
Cat / Cow pose
Seated forward bend
Pigeon pose
Cobbler’s pose

Please repeat those yoga poses 3-5 times each, and take it very slowly, you don’t need to rush, and do not need to finish it in a certain time frame, just take your time and listen to your body, feel it. If there is one particular pose you are feeling good about it, do it more and enjoy it!
Key: Imagination plays a role here!
Always imaging there is an invisible rope pulling you up or toward the front, it will help you to get the best result of stretch! try it!!
After your body has totally warm-up and stretched most of the back and pelvic muscle groups, we are going to do a 25 mins pilates.
I highly recommend Sanne Vloet’s pilates youtube channel
She has so many amazing pilates videos that only take 15-30 mins. Although it is not easy, I feel so relaxed after I have done it every time!
This is the 25 mins full-body pilates I did for this decompress spine project.
Again, taking it slow is the key! No rush!
I have to be honest with you, I did not finish within 25 mins. I had to take my time.
While I had the lower back pain, some poses in this video were a little bit challenging to me, such as doing a left side plank, I found myself having a hard time doing it because my left lower back and muscle group could not keep with my whole body weight, 5 years is long enough to weaken the muscle. So I paused, taking it slow to finish all the exercises in the video.
The key point is on the 24:07 Sanne ending the exercise with Ardha Mastsyendrasana (Spine twisting pose) This is the step you absolutely can’t skip!

FINALLY! I decompressed my spine in 3 steps in three days! I did it! When I heard the loud and clear cracking sound from my left lower back, the sound that my masseuses and chiropractic therapists tried very hard to make it is finally happened! I could not believe it! I was overjoyed and instantly felt my body was lighter and energized again.
If you ask me what was the first thing that came through my mind: I am going to spread the words to the world! I feel you and I wish you can be out of your back pain soon. My not-so-comfortable journey has ended, so do you must believe yourself it could happen, and it is not hard.
Give it a try, or share the words if this post helped you as well!
If today is not the day, maybe tomorrow, maybe next week, or the next month! Keep going! YOU CAN DO IT!
Let me know how you feel and I can’t wait to hear the good news from you! And you must know, I am with you on this journey!

continue reading…
How to decompress your spine in 3 steps- Part I
Symptoms of a herniated disc over time
How to decompress spine in 3 steps- Part II
First aid for your lower back pain while living with it
How to decompress spine in 3 steps- Part III
Let’s talk about the synergy we often overlook!
How to decompress spine in 3 steps- Part V
Self-reflection after 5 years experienced lower back pain
Keep well and be happy!
Gabrielle

